MPPT Solar Charge Controllers Explained
What is a solar charge controller?
A solar charge controller, also known as a solar regulator, is a device that manages the flow of power from your solar panels to your battery. Its primary job is to regulate the battery charging process to ensure the battery is charged correctly and efficiently, or more importantly, not over-charged by precisely controlling the battery charge voltage.
In more technical terms, a charge controller is a DC-to-DC power converter that regulates the voltage and current from the solar panels to match the battery's charging requirements. More advanced models, known as MPPT (Maximum Power Point Tracking) controllers, improve efficiency by adjusting (tracking) to the changing voltage from solar panels throughout the day, helping to generate more energy under variable weather conditions.
Solar charge controllers are used in almost all off-grid and stand-alone solar systems, from small caravan setups to large battery-based solar power systems. They are typically rated by:
Amps (A) – the maximum amount of current they can send to the battery.
Volts (V) – the maximum input voltage they can accept from the solar panel array.
Understanding these ratings is very important when selecting a controller, as they determine the number of solar panels you can connect and the battery size you can charge. We’ll explain these details and how to size a controller correctly in the sections below.
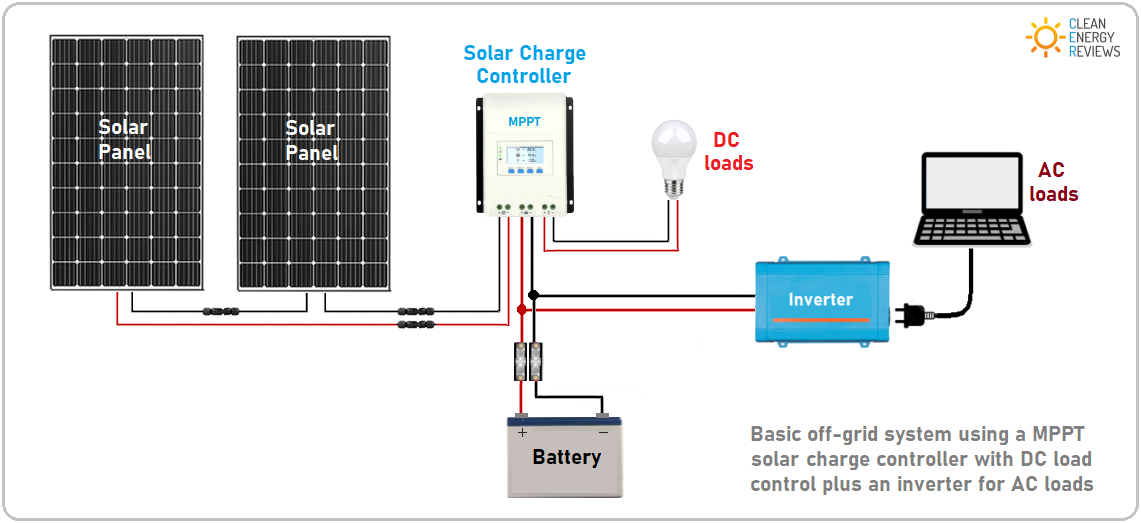
DC load control feature
Many solar charge controllers also feature a DC load output connection, which is used for lighting and/or controlled loads. Generally, most smaller 12V-24V charge controllers, with a capacity of up to 30A, have DC load terminals and are used for caravans, RVs, and small buildings. On the other hand, most larger, more advanced 60A+ MPPT solar charge controllers do not have load output terminals as they are designed for larger-scale off-grid systems with AC loads powered by off-grid inverters.
MPPT Vs PWM solar charge controllers
There are two primary types of solar charge controllers: PWM (Pulse Width Modulation) and MPPT (Maximum Power Point Tracking). The latter is the primary focus of this article, due to its increased charging efficiency, improved performance, and other advantages, which are explained below.
PWM solar charge controllers
Simple PWM, or ‘pulse width modulation’ solar charge controllers, have a direct connection from the solar array to the battery and use a basic ‘rapid switch’ to modulate or control the battery charging. The switch (transistor) opens until the battery reaches the absorption charge voltage. Then, the switch opens and closes rapidly (hundreds of times per second) to modulate the current and maintain a constant battery voltage. This works okay, but the problem is the solar panel voltage is pulled down to match the battery voltage. This, in turn, pulls the panel voltage away from its optimum operating voltage (Vmp) and reduces the panel power output and operating efficiency.

As shown in the diagram, PWM controllers force the panel to operate at the battery voltage (12V) which is less efficient.
PWM solar charge controllers are a great low-cost option for small 12V systems when one or two solar panels are used, such as simple applications like solar lighting, camping and basic things like USB/phone chargers. However, if more than one panel is needed, they must be connected in parallel, not in series (unless the panels are very low voltage and the battery voltage is higher).
MPPT solar charge controllers
MPPT stands for Maximum Power Point Tracker; these are far more advanced than PWM charge controllers and enable the solar panel to operate at its maximum power point, or more precisely, the optimum voltage and current for maximum power output. Using this clever technology, MPPT solar charge controllers can be up to 30% more efficient, depending on the battery and operating voltage (Vmp) of the solar panel. The reasons for the increased efficiency and how to correctly size an MPPT charge controller are explained in detail below.
As shown in the diagram, MPPT controllers enable the panel to operate at it’s optimum power (Vmp) voltage which is more efficient.
As a general guide, MPPT charge controllers should be used on all higher-power systems that use two or more solar panels in series, or whenever the panel's operating voltage (Vmp) is 8-10V or higher than the battery voltage. See the full explanation below.
✅ Advantages of MPPT Solar Charge Controllers
Higher Efficiency – Extracts the maximum available power from solar panels by tracking the optimal voltage and current (up to 30% more efficient than PWM controllers).
Better Performance in Varying Conditions – Adjusts to changes in sunlight, temperature, and panel voltage to maintain optimal charging.
Flexible System Design – Allows higher panel voltages and longer strings, reducing cable size and voltage drop over long distances.
Faster Battery Charging – Delivers more usable power to the battery, helping charge faster, especially in low light or during peak sun hours.
What is an MPPT or maximum power point tracker?
A maximum power point tracker, or MPPT, is basically an efficient DC-to-DC converter used to maximise the power output of a solar system. The first MPPT was invented by a small Australian company called AERL way back in 1985, and this technology is now used in virtually all grid-connected solar inverters and all MPPT solar charge controllers.
The functioning principle of an MPPT solar charge controller is relatively simple. Due to the varying amount of sunlight (irradiance) that falls on a solar panel throughout the day, the panel's voltage and current continuously fluctuate. To generate the most power, an MPPT sweeps through the panel voltage to find the optimal combination of voltage and current that produces the maximum power. The MPPT continually tracks and adjusts the PV voltage to generate maximum power, regardless of the time of day or weather conditions. Using this clever technology, operating efficiency increases significantly, and the energy generated can be up to 30% more than that of a PWM charge controller.
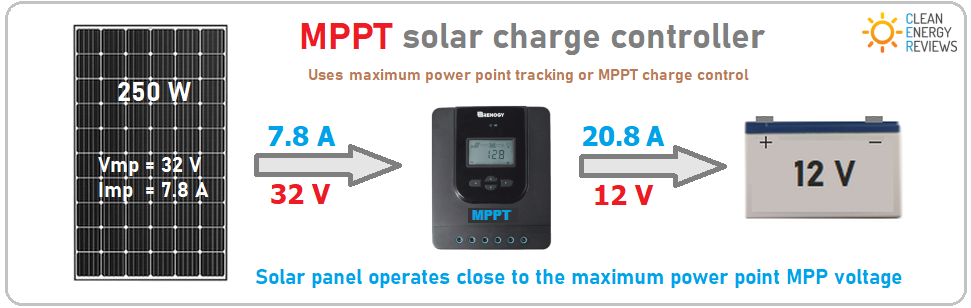
PWM Vs MPPT: Real-world example
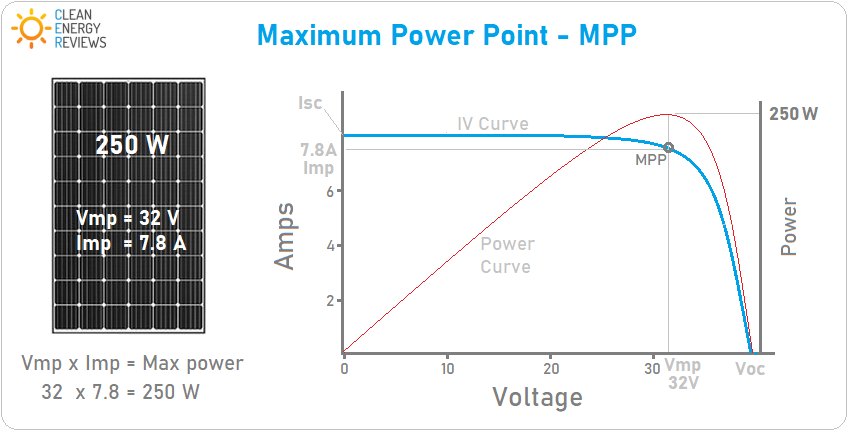
In the example shown below, a common 60-cell (24V) solar panel with an operating voltage of 32V (Vmp) is connected to a 12V battery bank using both a PWM and an MPPT charge controller. Using the PWM controller, the panel voltage must drop to match the battery voltage, resulting in a dramatic reduction in power output. With an MPPT charge controller, the panel can operate at its maximum power point, generating significantly more power in return.

What are the best MPPT solar charge controllers?
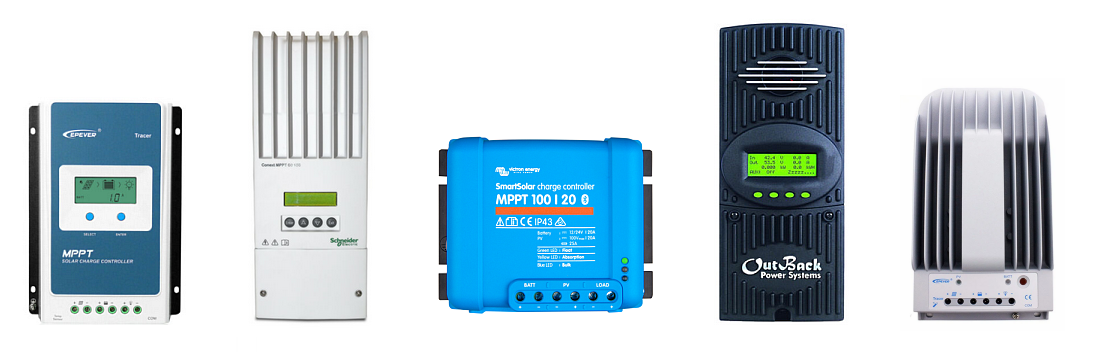
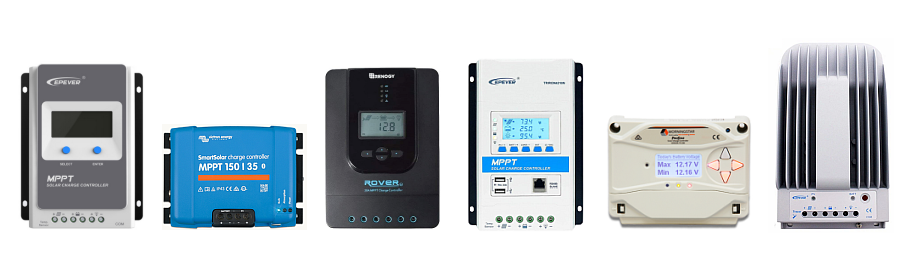
Victron Energy’s SmartSolar MPPT series is widely regarded as the industry leader, offering excellent build quality, built-in Bluetooth, and intelligent charging profiles suited to both lithium and lead-acid batteries. For large, customizable systems, the MidNite Solar Classic provides unmatched flexibility and is one of the few MPPT controllers that supports wind and hydro inputs. The OutBack FLEXmax series is a long-time favourite for remote installations thanks to its proven durability and strong thermal performance. In Australia, the AERL SRX series is a local favourite for high-performance systems requiring longer strings up to 600V.
Meanwhile, Renogy’s Rover MPPT offers great value for small-scale and entry-level systems, while EPEver’s Tracer series delivers dependable mid-range performance at a budget-friendly price. For mission-critical and industrial-grade systems, the Morningstar TriStar MPPT is renowned for its rock-solid reliability, advanced protection features, and remote management capabilities.
For more details on each of these MPPT charge controllers, see our detailed review of the best mid-level MPPT solar charge controllers for small-scale off-grid systems up to 40A. Also, see our review of the more powerful, high-performance MPPT charge controllers used for professional, large-scale off-grid systems.
The best MPPT solar charge controllers up to 40A including Victron, Epever, Morningstar and Renogy Rover.
MPPT & Battery Voltage
Unlike battery inverters, most MPPT solar charge controllers can be used with various battery voltages from 12V to 48V. For example, most smaller 10A to 30A charge controllers can charge either a 12V or 24V battery, while most larger capacity or higher input voltage charge controllers are designed for 24V or 48V battery systems. A select few, such as the Victron 150V range, can be used on all battery voltages from 12V to 48V. Several high-voltage solar charge controllers, such as those from AERL and IMARK, can be used on 120V battery banks.
Besides the current (A) rating, the battery voltage also limits the maximum solar array size connected to a solar charge controller. As highlighted in the following diagram, using a 24V battery enables twice the amount of solar power to be connected to a 20A solar charge controller compared to a 12V battery.

The diagram above shows how a higher 24V battery enables double the number of solar panels to be connected using the same 20A solar charge controller.
Higher battery voltage = Higher Power
Based on Ohm’s law and the power equation, higher battery voltages enable more solar panels to be connected to the same size charge controller. This is due to the simple formula:
Power (W) = Voltage (V) x Current (A)
For example, A 12V battery with a 20A MPPT charge controller at full power is capable of charging at 250W (20A x 12.5V = 250W). On the other hand, a 24V battery with the same 20A MPPT charge controller is capable of charging at 500W (20A x 25V = 500W). Therefore, using a 20A controller with a higher 24V battery, as opposed to a 12V battery, will allow double the amount of solar to be connected. Regarding system cost, higher-voltage systems enable larger solar systems to be connected using less equipment, and therefore, lower upfront costs.
20A MPPT with a 12V battery = 260W max Solar recommended
20A MPPT with a 24V battery = 520W max Solar recommended (2 x 12V)
20A MPPT with a 48V battery = 1040W max Solar recommended (4 x 12V)
Note that oversizing the solar array is allowed by some manufacturers to ensure an MPPT solar charge controller operates at the maximum output charge current, provided the maximum input voltage and current are not exceeded! See more in the oversizing solar section below.
Which battery voltage is best: 12V, 24V or 48V?
Generally, higher battery voltages are preferable for larger systems due to several key reasons. The most obvious is the reduced current draw for the same amount of power, resulting in lower resistance and cable losses, less voltage drop and increased efficiency across all power conversion equipment, including inverters and MPPTs. Simple 12V battery systems are still viable for smaller systems used in RVs and caravans, but are generally not recommended for any AC power draw greater than 2400W. For example, a 12-volt 3000W inverter at full power will draw over 250A from the battery system (3000W/12V = 250A). In comparison, a 48-volt 3000W inverter will only draw around 65A, meaning less resistance, smaller cables and associated fuses and breakers are needed.
Higher voltage = Higher efficiency and less thermal stress
Higher current in an electrical system results in increased heat generation across all electrical components, including resistors, capacitors, and inductors, leading to thermal expansion and contraction with each heat cycle; this is a primary cause of electronic failures. This expansion and contraction also induce mechanical stress on circuit boards and components. In inverters, voltage is elevated from battery voltage to the output voltage (e.g., 120VAC or 240VAC) through rapid switching of transistor switches. Transitioning from 12V to 120V AC is four times more demanding than transitioning from the 52-54V range of a 48V system, thereby magnifying stress levels. Opting for a 48V system also reduces wire costs and minimises longer-term replacement expenses due to reduced stress on components and less chance of failure.
Benefits of using a 48V battery system compared to a 12V system:
More solar per MPPT: As previously explained, a higher voltage battery system enables more solar power to be connected to an MPPT solar charge controller due to the reduced current.
Higher Efficiency: A 48V system allows for more efficient power transmission and reduced losses compared to a 12V system. Higher voltage means lower current for the same power, resulting in reduced resistive losses in wires and connections.
Reduced Wiring Costs: Due to lower current requirements, a 48V system requires smaller wire sizes for interconnecting batteries and components, resulting in cost savings on wiring materials and installation.
Reduced chance of failure: A higher voltage and lower current reduce the heating effect caused by resistance in all connections and terminals. Consequently, if a faulty or loose connection is present and causes increased resistance, the lower current will generate less heat, minimising the risk of overheating and potential failure.
Solar panel Voltage Explained

The label on the back of a solar panel should list the panel power, current and voltages (Voc).
All solar panels have two voltage ratings measured under standard test conditions (STC) based on a cell temperature of 25°C. The first is the maximum power voltage (Vmp), which is the operating voltage of the panel. The Vmp will drop significantly at high temperatures and will vary slightly depending on the amount of sunlight. For the MPPT to function correctly, the panel's operating voltage (Vmp) must always be several volts higher than the battery charge voltage under all conditions, including high temperatures. See more information below about voltage drop and temperature.
The second is the open-circuit voltage (Voc), which is always higher than the Vmp. The Voc is reached when the panel is in an open-circuit condition, such as when a system is switched off or when a battery is fully charged, and no more power is needed. The Voc also decreases at higher temperatures, but more importantly, increases at lower temperatures.
Battery Voltage Vs Panel Voltage
For an MPPT charge controller to function correctly under all conditions, the solar panel operating voltage (Vmp) or the string voltage (if the panels are connected in series) should be at least 5V to 8V higher than the battery charge (absorption) voltage. For example, most 12V batteries have an absorption voltage of 14 to 15V; therefore, the Vmp should be a minimum of 20V to 23V, considering the voltage drop at higher temperatures. On average, the real-world operating voltage is around 3V lower than the optimum panel voltage (Vmp). This String Voltage Calculator helps you quickly determine the solar string voltage using historical temperature data specific to your location.
12V Batteries
In the case of 12V batteries, the panel voltage drop due to high temperature is generally not a problem since even smaller (12V) solar panels have a Vmp in the 20V to 22V range, which is much higher than the typical 12V battery charge (absorption) voltage of 14V. Additionally, common 60-cell (24V) solar panels are not a problem, as they operate in the 30V to 40V range, which is significantly higher.
24V Batteries
In the case of 24V batteries, there is no issue when a string of two or more panels is connected in series; however, a problem arises when only one solar panel is connected. Most common (24V) 60-cell solar panels have a Vmp of 32V to 36V. While this is higher than the battery charging voltage of approximately 28V, the problem occurs on very hot days when the panel temperature increases, causing the panel Vmp to drop by up to 6V. This significant voltage drop can result in the solar voltage falling below the battery charge voltage, thus preventing it from fully charging. A way to get around this limitation when using one panel is to select a larger, higher-voltage 72-cell or 96-cell panel.
48V Batteries
When charging 48V batteries, the system requires a string of at least two panels in series, but will perform much better with three or more panels in series, depending on the maximum input voltage of the charge controller. Since most 48V solar charge controllers have a max voltage (Voc) of 150V, this generally allows a string of 3 panels to be connected in series. The higher-voltage 250V to 450V charge controllers can accommodate strings of 5 to 8 or more panels, which is more efficient for larger solar arrays, as it increases the string voltage and reduces or even eliminates the need to parallel strings, thereby lowering installation costs and increasing efficiency.
Note: Multiple panels connected in series can produce hazardous voltage levels and must be installed by a qualified electrical professional, ensuring compliance with all local standards and regulations.
Solar Panel Voltage Vs Temperature
The power output of a solar panel can vary significantly depending on the temperature and weather conditions. A solar panel's power rating (W) is measured under Standard Test Conditions (STC), at a cell temperature of 25°C and an irradiance level of 1000 W/m². However, during sunny weather, solar panels slowly heat up, and the internal cell temperature will generally increase by at least 25°C above the ambient air temperature; this results in increased internal resistance and a reduced voltage (Vmp). The amount of voltage drop is calculated using the voltage temperature coefficient listed on the solar panel datasheet. Use the Solar Voltage Calculator to determine string voltages at various temperatures.
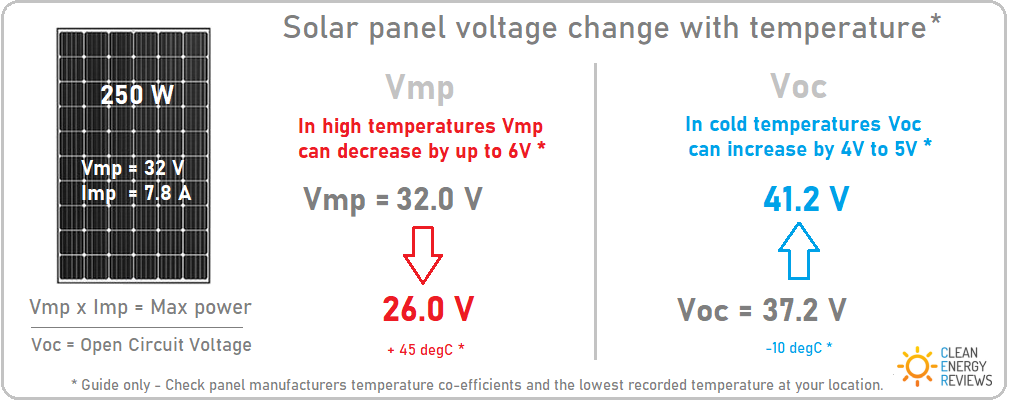
Both the Vmp and Voc of a solar panel will decrease during hot, sunny weather as the cell temperature increases. During very hot days, with little wind to disperse heat, the panel temperature can rise as high as 80°C when mounted on a dark-coloured rooftop. On the other hand, in cold weather, the operating voltage of the solar panel can increase significantly, up to 5V or even higher in freezing temperatures. Voltage rise must be taken into account, as it could result in the Voc of the solar array exceeding the maximum voltage limit of the solar charge controller and damaging the unit.

Solar panel voltage Vs Temperature graph - Based on a Trina Solar Vertex 400W solar panel
Panel Voltage Vs Temperature graph notes:
STC = Standard test conditions - 25°C (77°F)
NOCT = Nominal operating cell temperature - 45°C (113°F)
(^) High cell temp = Typical cell temperature during hot summer weather - 65°C (149°F)
(#) Maximum operating temp = Maximum panel operating temperature during extremely high temperatures mounted on a dark rooftop - 85°C (185°F)
Voltage increase in cold weather - A common problem
Example: A Victron 100/50 MPPT solar charge controller has a maximum solar open-circuit voltage (Voc) of 100V and a maximum charging current of 50 Amps. If you use 2 x 300W solar panels with 46Voc in series, you have a total of 92V. This seems okay, as it is below the 100V maximum. However, the panel voltage will increase beyond the listed Voc at STC in cold conditions below 25°C cell temperature.
The voltage increase is calculated using the solar panel's voltage temperature coefficient, typically 0.3% for every degree below STC (25°C). As a rough guide, for temperatures down to -10°C, you can generally add 5V to the panel Voc, which equates to a Voc of 51V. In this case, you would have a combined Voc of 102V. This exceeds the maximum 100V Victron 100/50 input voltage limit and could damage the MPPT, voiding your warranty.
There are two ways to get around the high voltage issue:
Solution 1: Select a different MPPT solar charge controller with a higher input voltage rating, such as the Victron 150/45, which has a 150V input voltage limit.
Solution 2: Connect the panels in parallel, not in series. The maximum voltage will now be 46V + 5V = 51Voc. Note that this will only work if you use a 12V or 24V battery system; it’s unsuitable for a 48V system, as the voltage is too high. Also note that the solar input current will double in parallel, so the solar cable should be rated accordingly.
Note: Assuming you use a 12V battery and 2 x 300W panels, the MPPT charger controller output current will be roughly 600W / 12V = 50A max. Therefore, it is recommended to use a 50A MPPT solar charge controller.
** Use the free String Voltage Calculator to calculate your string voltages accurately.

How to correctly size an MPPT solar charge controller
MPPT Sizing Guide for Lead-Acid Batteries
As a general rule for lead-acid batteries, the charge controller's Amp (A) rating should be 10 to 20% of the battery's Amp-hour (Ah) rating. Compared to modern lithium batteries, lead-acid batteries require longer charging times through a three-stage process, which includes bulk, absorption, and float stages. The bulk charge process gradually increases the battery voltage up to the absorption voltage, which is then maintained at a constant level for several hours until the charge current reduces to a fraction of the bulk current. This is due to the slower chemical reaction time of a lead-acid battery cell. If it is rushed, it can overheat, cause excessive gassing and swelling, and damage the battery cell.
For example, a 100Ah 12V lead-acid battery will need a 10A to 20A solar charge controller. During sunny weather, a 150W to 200W solar panel should generate a minimum 10A* charge current required for a 100Ah battery to reach the adsorption charge voltage, provided it is orientated correctly and not shaded. Always refer to the battery manufacturer’s specifications.
MPPT Sizing Guide for Lithium Batteries
For lithium batteries, the charge controller’s Amp (A) rating can be significantly higher than for lead-acid batteries, typically ranging from 20% to 60% of the battery’s Amp-hour (Ah) capacity. This is because lithium batteries, such as LiFePO₄ (LFP), can accept much higher charge rates and do not require the long absorption and float stages used with lead-acid batteries. Instead, lithium batteries can be charged using a two-stage process: bulk and absorption (also known as constant current and constant voltage stages).
During the bulk stage, the controller delivers maximum current until the battery reaches its maximum charge voltage — usually around 14.2V to 14.6V for a 12V LFP battery — after which it maintains a constant voltage while the current tapers off. Generally, no float stage is required, and many lithium battery BMSs will bypass or ignore a float charge altogether.
For example, a 100Ah 12V lithium battery can safely handle a charge current of 20A to 50A, depending on the manufacturer’s specifications. A properly sized charge controller in this case might be rated for 30A or 40A, and combined with 400W to 600W of solar, the system could fully recharge the battery in just a few hours under good conditions. Some high-performance lithium batteries even allow charge rates of 1C (100A for a 100Ah battery), but this is generally not recommended unless explicitly approved.
MPPT Charging Comparison: Lead-acid Vs Lithium batteries
| Feature / Parameter | Lead‑Acid Batteries | Lithium Batteries (LiFePO₄) |
|---|---|---|
| Recommended Charge Current | 10 % – 20 % of Ah rating | 20 % – 60 % of Ah rating (some up to 100 %) |
| Charging Stages ** | Bulk → Absorption → Float | Bulk → Absorption (float optional) |
| Absorption Voltage ** (12 V) | 14.2 V – 14.8 V (temp‑dependent) | 14.2 V – 14.6 V (fixed) |
| Float Voltage ** (12 V) | 13.2 V – 13.6 V | Refer to manufacturer |
| Charge Time | Slower (5 – 8 + hours) | Faster (1.5 – 4 hours) |
| Temperature Compensation | Required | Not required (can be harmful) |
| Charge Controller Size | Smaller (10 A – 20 A for 100 Ah) | Larger (30 A – 50 A for 100 Ah) |
| Charge Sensitivity | Sensitive to high current, heat, gassing | More tolerant of fast charging |
** Always check the battery datasheet or BMS limitations to confirm the maximum charge current and voltage, and ensure the charge controller settings (especially absorption voltage and temperature compensation) are compatible with lithium chemistry. Overcharging or using incorrect voltage thresholds can trigger the internal battery management system (BMS) to disconnect the battery, resulting in system faults, performance issues, or even a catastrophic failure.
Advanced Guide to Solar System Design using MPPTs
Before selecting an MPPT solar charge controller and purchasing panels, batteries or inverters, you should understand the basics of sizing an off-grid solar power system. The general steps are as follows:
Calculate the loads - Use a load table to estimate the amount of energy used per day (kWh)
Battery capacity - based on the loads, determine the battery capacity needed in Ah or kWh
Solar size - Calculate how many solar panel/s you need to charge the battery (W)
Charge controller size - Select a suitable MPPT Solar Charge Controller to match the solar (A)
Inverter Size - Select an off-grid inverter to suit the continuous and peak loads.
1. Estimate the loads
The first step is to determine the loads using a load calculator (see below). This estimates the daily energy requirement based on the appliances you will be using and their usage duration. This is done by multiplying the appliance power rating (W) by the average runtime (hr) to give you the total Wh. Alternatively, use the average current draw (A) multiplied by the runtime (hr) to calculate the energy in Ah. In temperate climates with shorter winter days and high loads, the load table should focus more on winter load demand, as it will generally be higher.
Energy required in Watt-hours (Wh) = Power (W) x Time (hrs)
Energy required in Amp-hours (Ah) = Amps (A) x Time (hrs)
Once this is calculated for each appliance or device, the total daily energy requirement (kWh) can be determined.
Use an Off-Grid size calculator or the Off-Grid Load Table as shown in the image below.

Interactive off-grid load table used to easily calculate the average daily energy consumption in kWh - Powered by Photonik
2. Sizing the Battery
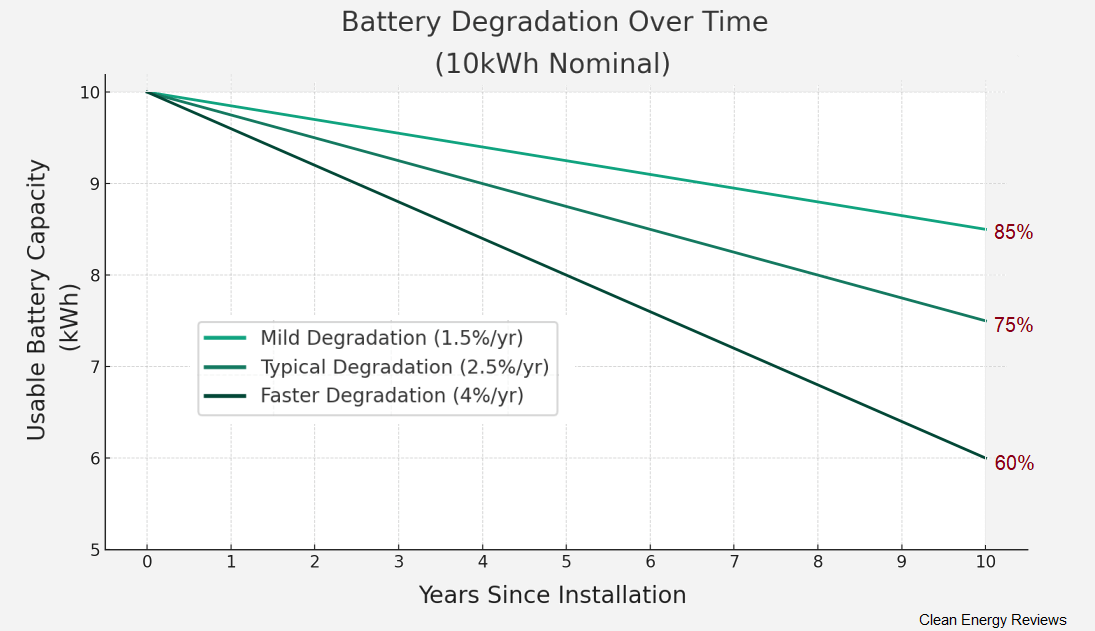
The total load measured in Ah or Wh is used to size the battery. Lead-acid batteries are sized in Ah, while lithium batteries are sized in either Wh or Ah. The allowable daily depth of discharge (DOD) differs significantly for lead-acid and lithium batteries; see more details about the differences between lead-acid and lithium batteries. In general, lead-acid batteries should not be discharged below 70% State of Charge (SoC) on a daily basis, while Lithium (LFP) batteries can be discharged down to 20% SoC daily. Note: Lead-acid (AGM or GEL) batteries can be deeply discharged, but this practice will significantly reduce the battery's lifespan if done regularly.
For example, if you have a 30Ah daily load, you will need a minimum 100Ah lead-acid battery or a 40Ah lithium battery. However, taking into account poor weather, you will generally require at least two days of autonomy, so this equates to a 200Ah lead-acid battery or an 80Ah lithium battery. Depending on your application, location, and time of year, you may even require 3 or 4 days of autonomy.
Charging a battery too quickly can add internal stress and heat the cells, thereby increasing degradation. Generally, the BMS can manage the charge rates to avoid these issues; however, the inverter must also be configured and sized correctly to prevent overcharging the battery. Learn more about how to increase the lifespan of a lithium battery system.
3. Sizing the Solar
The solar size (W) should be large enough to fully charge the battery on a typical sunny day in your location. There are many variables to consider, including panel orientation, time of year & shading issues. This is actually quite complex, but one way to simplify things is to roughly calculate the number of watts required to produce 20% of the battery capacity in Amps. Oversizing the solar array is also allowed by some manufacturers to help overcome some of the losses. You can use this free off-grid solar size calculator to help estimate the required solar array size based on your consumption.
Solar Sizing Example: Based on the 20% rule, a 12V, 200Ah battery will need up to 40 amps of charge. If we are using a common 250W solar panel, then we can do a basic voltage and current conversion:
Using the equation (P/V = I) then 250W / 12V battery = 20.8A
In this case, to achieve a 40A charge, we would need at least 2 x 250W panels. Remember, there are several loss factors to consider, so slightly oversizing the solar system is a common practice. See more about oversizing solar below.
4. Solar Charge Controller Sizing (A)
The MPPT solar charge controller size should be roughly matched to the solar size. A simple way to work this out is using the power formula:
Power (W) = Voltage x Current or (P = V*I)
If we know the total solar power in watts (W) and the battery voltage (V), then to work out the maximum current (I) in Amps, we rearrange this to work out the current - so we use the rearranged formula:
Current (A) = Power (W) / Voltage or (I = P/V)
For example, if we have 2 x 200W solar panels and a 12V battery, then the maximum current = 400W/12V = 33A. In this example, we could use either a 30A or 35A MPPT solar charge controller.
5. Selecting an off-grid inverter
Off-grid inverters are available in a wide range of sizes determined by the inverter’s continuous power rating measured in kW (or kVA). More importantly, inverters are designed to operate with only one battery voltage, typically 12V, 24V or 48V. You cannot use a 24V inverter with a lower 12V or higher 48V battery system. Pro-tip: It’s more efficient to use a higher battery voltage due to the lower current, resulting in reduced cable and conversion losses.
After the battery voltage, the next key consideration for selecting an off-grid inverter is the average continuous AC load (demand) and short-duration peak loads, which can be calculated in the load table. Due to temperature de-rating in hot environments, the inverter should be sized around 20 to 30% higher than the average load or maximum demand of the appliances it will be powering. Whether the loads are inductive or resistive is also very important and must be considered. Resistive loads such as electric kettles or toasters are very simple to power, while inductive loads like water pumps and compressors put much more stress on the inverter. Regarding peak loads, most off-grid inverters can handle surge loads up to double (2x) the continuous rating.
Inverter sizing example:
Average continuous loads = 120W (fridge) + 40W (lights) + TV (150W) = 310W
High or surge loads = 2200W (electric kettle) + toaster (800W) = 3000W
Considering the above loads, a 2400W inverter, with 2x (4800W) peak output, would be adequate for the smaller continuous loads and easily power the short-duration peak loads.
* ATTENTION SOLAR DESIGNERS - Learn more about selecting off-grid inverters and sizing solar systems in our advanced technical off-grid system design guide.
MPPT Solar Oversizing
Due to the various losses in a solar system, it is common practice to oversize the solar array to enable the system to generate more power during bad weather and under various conditions, such as high temperatures where power derating can occur. The main loss factors include - poor weather (low irradiation), dust and dirt, shading, poor orientation, and cell temperature de-rating. Learn more about solar panel efficiency and cell temperature de-rating here. These loss factors combined can reduce power output significantly. For example, a 300W solar panel will generally produce 240W to 270W on a hot summer day due to the high-temperature power de-rating. Depending on your location, reduced performance will also occur in winter due to low solar irradiance. For these reasons, oversizing the solar array beyond the manufacturers ‘recommended or nominal value’ will help generate more power in unfavourable conditions.

Example. A Victron MPPT charge controller with 180% solar oversizing will generate a lot of heat, requiring adequate ventilation.
Oversizing by 150% (Nominal rating x 1.5) is possible on many professional MPPT solar charge controllers and will not damage the unit. However, many cheaper MPPT charge controllers are not designed to operate at full power for an extended period, as this can damage the controller. Therefore, it is essential to check whether the manufacturer allows oversizing.
Morningstar and Victron Energy allow oversizing well beyond the nominal values listed on the datasheets as long as you don’t exceed the input voltage and current limits. Victron MPPT controllers have been successfully used with 200% solar oversizing without any issues. However, the higher the oversizing, the longer the controller will operate at full power and the more heat it will generate. Without adequate ventilation, excess heat may cause the controller to overheat and derate power, or, in a worst-case scenario, result in complete shutdown or even permanent damage. Therefore, always ensure adequate clearance around the controller, as specified by the manufacturer, and add fan-forced ventilation if necessary.
Warning - you must NEVER exceed the maximum INPUT voltage (Voc) or maximum input current rating of the solar charge controller!
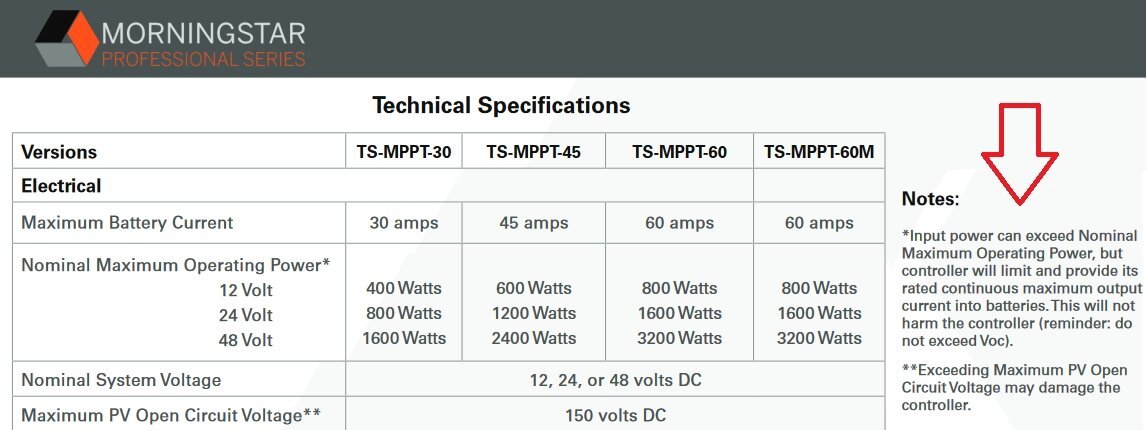
Example: Specification sheet from Morningstar highlighting this manufacturer allows oversizing of solar.
IMPORTANT - Oversizing solar is only allowed on some MPPT solar charge controllers, such as those from Victron Energy, Morningstar and EPever. Oversizing on other models could void your warranty and result in damage or serious injury to persons or property - always ensure the manufacturer allows oversizing and never exceed the maximum input voltage or current limits.

Extract from the EPever AN series operating manual stating 50% solar oversizing allowed.
More about MPPT Solar Sizing
As previously mentioned, all solar charge controllers are limited by the maximum input voltage (V - Volts) and maximum charge current (A – Amps). The maximum voltage determines how many panels can be attached (in series), and the current rating will determine the maximum charge current and, in turn, what size battery can be charged.
The solar array should be able to generate close to the charge rating (A) of the controller, which should be sized correctly to match the battery. Another example: a 200Ah 12V battery would require a 20A solar charge controller and a 250W solar panel to generate close to 20A. (Using the formula P/V = I, then we have 250W / 12V = 20A).
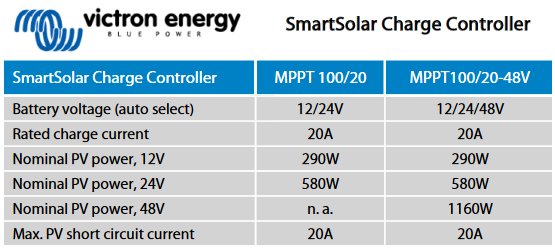
Example 1 - Victron Energy MPPT solar charge controller specifications for the SmartSolar 100/20
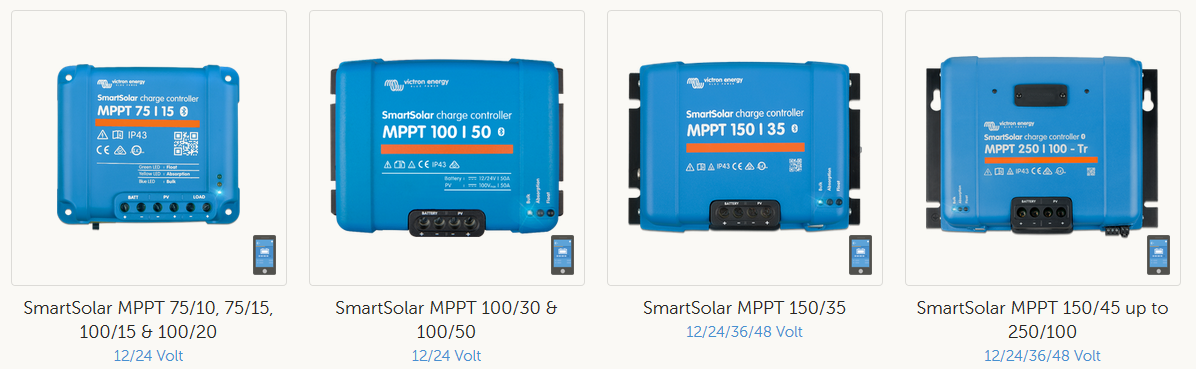
Victron Energy have a very wide range of MPPT solar charge controllers - Image credit Victron
As shown above, a 20A Victron 100/20 MPPT solar charge controller together with a 12V battery can be charged with a 290W ‘nominal’ solar panel. Due to the losses described previously, it could also be used with a larger ‘oversized’ 300W to 330W panel. The same 20A Victron charge controller used with a 48V battery can be installed with a much larger solar array with a nominal size of 1160W.
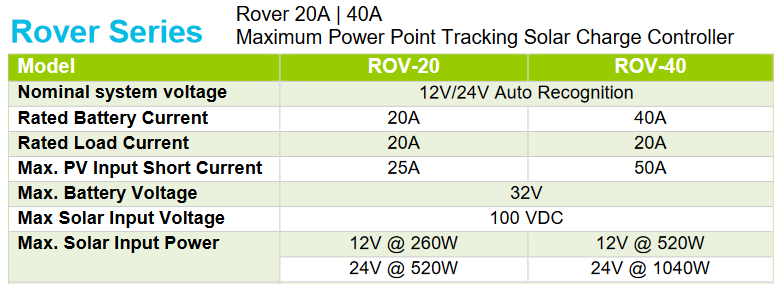
Example 2 - Renogy Rover MPPT solar charge controller electrical specifications - Note the Maximum solar input power rating - oversizing beyond this is not permitted.
Victron Vs Renogy MPPT charge controllers
Compared to the Victron MPPT charge controller above, the Rover series from Renogy does not allow solar oversizing. The Rover spec sheet states the ‘Max. Solar input power’ as above (not the nominal input power). Oversizing the Rover series will void the warranty. Below is a simple guide to selecting a solar array to match various size batteries using the Rover series MPPT charge controllers.
20A Solar Charge Controller - 50Ah to 150Ah battery
20A/100V MPPT - 12V battery = 250W Solar (1 x 260W panels)*
20A/100V MPPT - 24V battery = 520W Solar (2 x 260W panels)*
40A Solar Charge Controller - 150Ah to 300Ah battery
40A/100V MPPT - 12V battery = 520W Solar (2 x 260W panels)*
40A/100V MPPT - 24V battery = 1040W Solar (4 x 260W panels)*
* Remember that only selected manufacturers allow the solar array to be oversized, as long as you do not exceed the charge controller's max voltage or current rating - always refer to manufacturers’ specifications and guidelines.
Solar Charge Controller Price Guide
The older, simple PWM, or pulse width modulation, charge controllers are the cheapest type available and cost as little as $40 for a 10A unit. In contrast, the more efficient MPPT charge controllers will cost anywhere from $80 to $2500, depending on the voltage and current (A) rating. All solar charge controllers are sized according to the charge current, which ranges from 10A up to 100A. Cost is directly proportional to the charge current and maximum voltage (Voc), with the higher voltage and current controllers being the most expensive.
A general guide to the cost of different size solar charge controllers:
PWM 100V Solar controllers up to 20A - $40 to $120
MPPT 100V Solar controllers up to 20A - $90 to $200
MPPT 150V Solar controllers up to 40A - $200 to $400
MPPT 150V Solar controllers up to 60A - $400 to $800
MPPT 250V Solar controllers up to 80A - $800 to $1200
MPPT 300V Solar controllers up to 100A - $900 to $1500
MPPT 600V Solar controllers up to 100A - $1600 to $2800
Disclaimer
This is to be used as a guide only. Before making any purchases or undertaking any solar/battery related installations or modifications, you must refer to all manufacturer’s specifications and installation manuals. All work must be done by a qualified person.
The comprehensive guide to solar battery and off-grid systems. How to select and size a home solar battery system and how much it may cost you. Also, alternatives to adding batteries and how energy efficiency can save you more than adding a battery.