Solar system fault finding guide & solutions
Solar panels are a great investment for most homes and businesses, but a surprising number of owners do not know if their solar panels are working correctly or if the system is performing as expected. This article will guide you through the most common solar system faults and help you determine if your system is operating correctly. We will also offer several solutions to some of the more common problems.
New to solar? Learn how solar works. Before we get into too much detail you will need a basic understanding of the terminology and how solar systems work. Also, when comparing your solar output it is important to know the difference between Kilowatts (kW) and Kilowatt-hours (kWh).
kW - Kilowatt = the amount of power being generated at a certain point in time.
KWh - Kilowatt-hour = the total amount of energy generated over time. Such as over a day.
Does your solar system have a problem?
If you believe your solar system is not operating correctly, or the performance has noticeably decreased, you may be able to diagnose a problem in several ways. Below are some of the common issues which can be easily rectified.

A common solar inverter showing the AC and DC isolator switches mounted either side (as per Australian solar installation standards)
Tripped Circuit Breakers
Check that your switchboard has no tripped circuit breakers. All solar systems must have a Solar AC circuit breaker to protect the solar inverter and connecting cables from overcurrent or electrical faults. Circuit breakers can be very sensitive and sometimes thermally trip during very hot sunny days. Also, a circuit breaker may overheat and trip if the connection is poor or the terminals are loose, especially during hot weather. If you discover a solar circuit breaker is frequently tripping, contact a licenced electrical professional to diagnose the problem or replace a faulty breaker. Learn more about issues with circuit breakers tripping in our solar forum.
AC and DC Isolators on or off
Are the solar AC and DC isolators in the on position? Most solar installations will have an AC and DC isolator switch next to the inverter. The switch should have an apparent on-and-off position, and one of them may have been turned off. In some older solar installations, the AC isolator might be an external circuit breaker (CB) that may have tripped off. Solar isolators are often very exposed and can be affected by sunlight (UV), causing degradation over time. High temperatures and poor internal connections can also cause premature failure and tripping issues with some CB isolators. If the CB is tripping frequently, you should have a licenced electrical professional examine the cause and replace it if it is faulty.
Is there enough sunlight?
Is there any daylight? This might be obvious to most, but most solar inverters (without batteries) will go into sleep mode at night or if sunlight falls below a certain level. This means the inverter may not have any lights showing at night. The inverter will only ‘wake up’ and begin generating once the sunlight has reached the required level to provide enough DC voltage to the inverter.
Check the solar generation history (if available)
After performing the simple checks explained above, another method to help diagnose an issue is to check how much power the system generates daily. For those with solar system monitoring apps, it is easy to compare the daily solar generation, measured in kWh (Kilowatt-hours), with previous days, weeks and months. Most modern solar inverters come with built-in Wi-Fi communication and a system monitoring app or website portal, although many older systems do not have any monitoring installed. Fortunately, many older solar inverters have a digital LCD display that can provide valuable information to help diagnose any faults or problems (explained in detail in the solar inverter section below).

The LCD display of a SMA solar inverter shows the current power being generated and the daily generation in kWh.
The solar inverter display or App can provide you with some basic information about how much power (kW) your system is generating at a single point in time and how much it has generated over recent days or weeks (kWh). If your system is not generating any power, you obviously have a severe problem. However, if the system is underperforming, it can be difficult to tell without knowing how much you should expect for that time of year. For example, the solar performance chart below highlights the significant difference between summer and winter generation in the southern part of Australia. Note this would be the opposite in the Northern states of the US, Europe and parts of Canada.
You can estimate your system performance using our free solar calculator tool.

Graph highlighting the large difference between summer and winter solar generation in Australia (Southern states).
Sudden high electricity bill?

Small electric heaters are convenient but very inefficient and consume a lot of electricity - often up to 20kWh per day
If you have solar and receive an unusually high electricity bill, this generally does not indicate that your solar system is not working correctly. There are many reasons for your electricity consumption to increase, which may not be obvious at first. Electricity bills are often much higher in winter due to electric heating or hot water systems unless your house is very efficient. Most people often don’t realise that small portable electric heaters use a huge amount of electricity (generally 2000 Watts) and can even consume the equivalent of an entire home energy use if left on overnight, which can easily double your electricity bill. Also, solar feed-in tariffs (credits) around Australia have decreased by almost 50% over the last few years, which means you will receive far less credit for the excess energy you sell to the grid. This is where increasing your self-consumption of solar by using simple timers and running appliances like dishwashers and dryers during the day can make a huge difference.
Check your solar generation and savings estimate
Unfortunately, it’s not uncommon for people who have purchased solar to be misinformed by a salesman or solar installer and told that their bills will be reduced to zero. Unless a detailed energy analysis has been undertaken and the solar system is adequately oversized to meet the household demand, reducing a bill to zero using solar is generally very difficult. On average, most households with solar installed will see a bill reduction of 40% to 70%, depending on how much electricity is used during the day and if you make the most of the free solar generation. You can estimate how much your electricity bill will be reduced using solar with our free solar calculator.
The amount of savings also depends on the feed-in tariff (credits) you receive from your electricity retailer, which can vary greatly depending on your state and the rates provided. Due to misleading information from some solar companies, your solar system may be working fine, but you have been given the wrong expectations. However, it may also be that your solar system is NOT working correctly or has been poorly installed. If this is the case, keep reading and we will help you investigate.
Factors that reduce solar system performance
When buying a solar system, the solar retailer or installer should provide you with a basic operating manual that includes a solar performance estimate; this will indicate how much solar energy you would expect to generate throughout the year (month-by-month averages). Remember, depending on your location, the summer months can produce up to 3 or 4 times more energy than the winter months due to the longer days and sunnier weather.
Solar panel power ratings are measured in Watts (W) and determined under standard test conditions (STC) at 25°C in a controlled lab environment. However, a solar panel will generally not produce at 100% of its rated power in real-world conditions due to one or more of the issues and loss factors listed below. On average, a solar panel will generate around 80% of its rated power depending on the orientation, season and air temperature. It is common for a 5kW solar array (group of panels) to produce only 4kW of power during the middle of the day in summer; this is why most modern solar arrays in Australia are oversized to 6.5kW and coupled with a 5kW solar inverter.
Leading causes of poor solar performance
Buildup of dirt, dust, mould, leaves or bird droppings
Solar panel orientation and tilt angle
Shading issues, even partial shading, can have a big impact
Faulty connections and rooftop isolators
Solar inverter problems or faults
High grid voltage issues
The local climate, seasons and weather conditions
Solar panel degradation or faults
Dirt and mould build up on panels
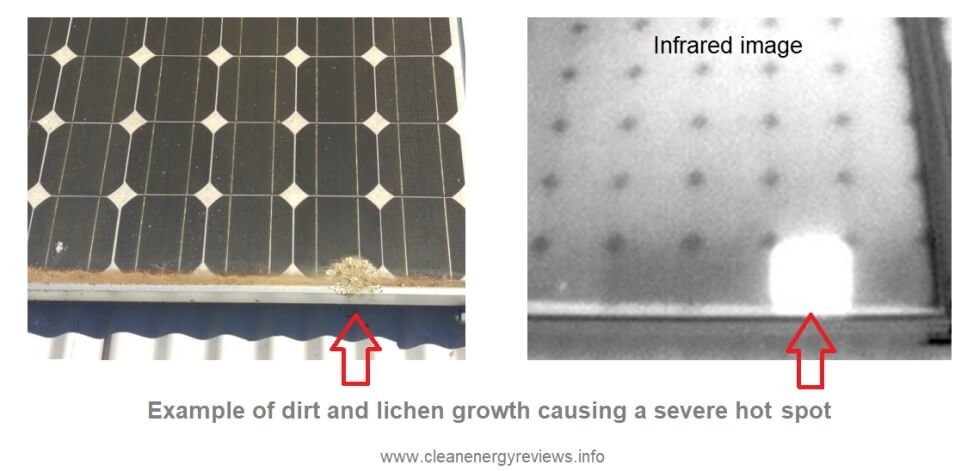
The build-up of dirt, dust and mould is a common reason for poor system performance and will reduce the power output by 5 to 10% on average. A build-up of dirt or bird droppings on one or more panels can have an even greater effect and cause hot spots if one or more solar cells are partially covered, causing a reverse current. Mould and lichen growth, especially in colder climates, can also severely reduce performance if the lichen grows over a portion of one of the cells, resulting in a reverse current. As the image below highlights, this can lead to hot spot formation and permanent cell damage. Any mould or lichen growth should be removed using water and a soft brush.
Solution - How to clean dirty solar panels
To reduce the adverse effects of dirty solar panels, it is recommended that panels be thoroughly cleaned at least once a year or more frequently in dusty environments. Cleaning solar panels should be done using only water and a soft broom. Solvents and harsh detergents should NOT be used to wash the surface of solar panels, as this can lead to water ingress and may void the manufacturer’s warranty. Note that cleaning solar panels on a roof can be very dangerous, so using a certified solar professional is advised.
How Solar Panel Orientation Can Affect Performance

Solar panel orientation and tilt greatly influence solar performance depending on your distance from the equator. In the southern hemisphere, the ideal orientation is north-facing (South in the northern hemisphere) at a tilt angle roughly equal to your latitude. For example, in Sydney, Australia, the ideal orientation is north-facing at 30 degrees. However, installing the solar array at the optimum orientation and tilt is often impossible or impractical, as the roof layout and angle determine the orientation of most rooftop solar systems. It is not uncommon for solar panels to face East and West due to the building orientation, but this does not mean the system will not perform well. In practice, a split East and West solar array will generate more energy in summer than a north-facing array. However, it’s important to note the winter performance will be much lower, which is often when the power is needed most for heating, particularly in colder climates. Use our free solar calculator to determine how much solar you should generate based on your location, panel orientation, and tilt angle.
Example: Annual solar performance in Victoria, Australia, from a 6.6kW solar system facing North at an average roof angle of 20 degrees. As shown in the chart below, solar generation in summer is more than double the winter months.

A solar performance estimate for Victoria, Australia - This will give you a good guide to determine if your system is performing as expected at certain times of the year.
Expected amount of generation in southern Australia from an average 6.6kW solar system.
Summer = 37 kWh/day
Winter = 16 kWh/day
Average = 27 kWh/day
Solar Panel Shading Issues
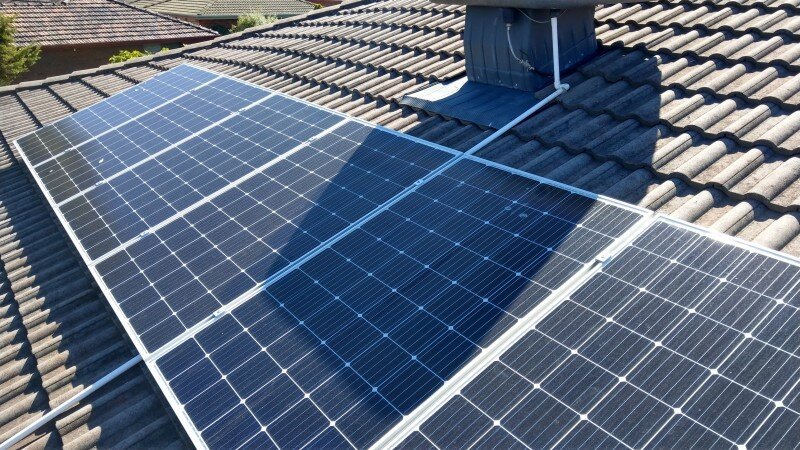
Solar array where the installation of a rooftop air-conditioner caused a serious shading issue.
Many people are unaware that a solar system's performance is affected by several important factors, the most significant of which is solar panel shading. Even partial shading of one or two solar panels can cause a serious reduction in system performance, so check that no trees or branches have grown significantly and are now shading one or more panels. Note that this may not be obvious during the middle of the day when the sun is higher in the sky. Throughout the year, the sun's path will change, and winter generally results in more frequent shading from nearby trees or roof-mounted objects.
To explain why partial shading is such a problem, you first need to have a basic understanding of how solar systems work - Solar panels are generally connected together in strings of 4 to 14 panels unless you have microinverters installed on each solar panel. The reason for this is that strings of panels generate a higher voltage, which is more efficient for your solar inverter to convert to AC electricity and power your home or business. However, if one or more panels in a string are shaded, it also affects the performance of all the other panels in the same string and can even lead to the formation of hot spots (hot cells) and failure of the bypass diodes, which can develop into a potentially dangerous situation. Learn more about the issues and potential dangers of fixed partial shading on solar panels.
Solution - If regular shading on a few panels is an obvious problem, it can be overcome by adding power optimisers such as those from Tigo Energy. Power optimisers are small add-on devices attached directly to each solar panel and effectively enable each panel to operate independently to minimise the impact of shading. Additionally, some solar inverters, such as those from Fronius, SMA, and Goodwe, have built-in shade functions to help lower losses in the case of partial shading. These functions can generally be enabled via the display or setup app.
Problems with Rooftop Isolators
Rooftop DC isolators have been a common source of faults in solar installations, particularly in Australia, where regulatory requirements mandated their installation on rooftops and next to solar inverters for many years. These isolators are designed to provide a means of disconnecting the direct current (DC) power generated by solar panels, facilitating maintenance and emergency shutdowns. However, the placement of these isolators in outdoor environments, exposed to harsh weather conditions, has led to numerous issues and even fires.
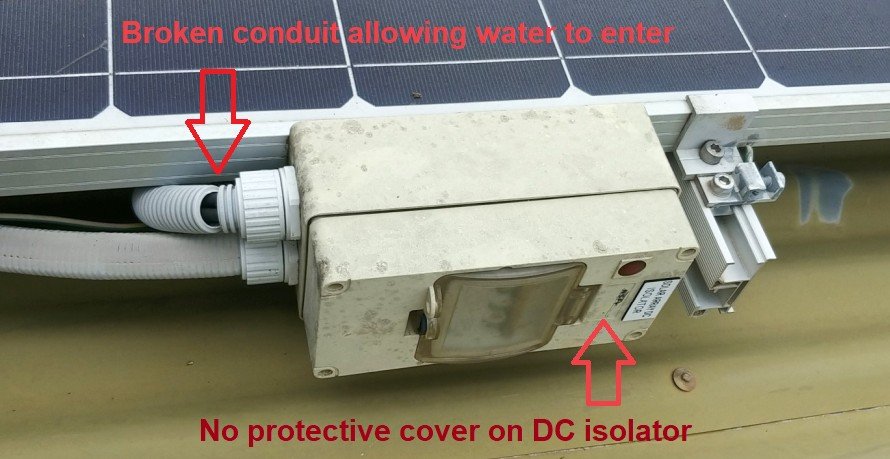
Solar rooftop DC isolator with no protective cover and broken conduit allowing water ingress. This is a severe problem and can result in fire.

A DC isolator next to a solar inverter with a top conduit entry allowing possible water ingress, leading to corrosion and failure.
A common problem with rooftop isolators is water ingress and faulty connections, often resulting from poor installation practices or substandard components. Over time, exposure to rain, humidity, and other environmental factors can cause seals to degrade, allowing water to penetrate the isolator enclosure. Water ingress poses a severe risk, leading to electrical arcing, corrosion, and, in extreme cases, electrical fires. As highlighted in the photo, DC isolators mounted next to solar inverters are another common cause of failure, especially if the solar conduit enters the top of the isolator, allowing water to flow directly into the isolator if there is ever a broken seal or crack along the conduit connecting the rooftop solar array to the inverter.
Regular maintenance and adherence to industry standards are crucial to mitigate rooftop isolator faults. This includes routine inspections for signs of corrosion or water damage and ensuring proper installation and secure cable connections to ensure overall reliability and safety. Solar DC isolator covers should be added to older systems installed before this was a regulatory requirement.
Solar inverter problems

A green light indicates normal operation.
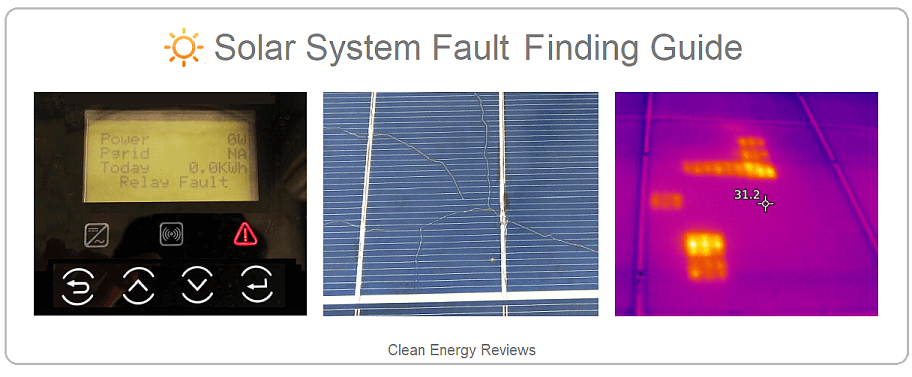
The first step is to check if the solar inverter has any warnings, alerts or red lights showing. If all operating lights are green, this is generally a sign that everything is ok. If any red lights are showing, then it’s very likely that you have an inverter or grid fault. You may also see an error code, if so the solar inverter manual should be able to give you some idea of what the fault code means. If your inverter has a display, you can check the amount of solar generation per day in kWh, and the instantaneous generation in watts or kilowatts (kW). The kWh figure per day is generally the most reliable as the instantaneous figure can be misleading depending on the time of day and orientation of the solar panels.

Solar inverter not working due to a relay fault detected
When comparing kWh figures, as explained above, remember to take into account the often large seasonal variations. For example, in most locations, summer generation is far greater than winter, and the difference becomes greater the closer you are to the poles. If the system has been installed for several years, you can often refer back to the previous year’s data for a much clearer comparison to see if the performance has noticeably dropped. However, be sure to check no trees have grown and are now causing shading.
Diagnosing a problem is typically much easier for those with microinverters such as Enphase or a SolarEdge system with DC optimisers as you can access individual panel performance and generation data. Also, those with advanced third party monitoring systems installed such as Solar Analytics will find it very easy to find out if there is a defect or performance problem as this system will automatically notify you.
High grid voltage issues explained
Most solar inverters will detect grid-related faults, such as high grid voltage, which can significantly reduce your solar system's performance. For a solar inverter to feed energy to the electricity grid, it must push out power at a slightly higher voltage than the grid. This is typically not a problem, but as more solar systems are connected to the electricity grid, especially in Australia, with almost one in four homes now with rooftop solar, the grid voltage can slowly increase to a point where it can no longer accept any more locally generated solar energy.
In Australia, high grid voltage issues generally start occurring at 253V and will become problematic above 255V. Due to the Australian standard AS 4777.2 and regulatory requirements of the local grid operators (known as the Electricity Distribution Network Service Providers or DNSP), all solar inverters must derate or switch off if the grid voltage goes above the local limit, which is typically 255V, for a short amount of time. Once the inverter has stopped generating, it cannot reconnect for 60 seconds before it can begin exporting once more. Unfortunately, this often results in the local grid voltage rising to the upper limit again and tripping off the inverter. This cycle can continue throughout the day, resulting in the spiked generation profile shown below and a notable reduction in performance.
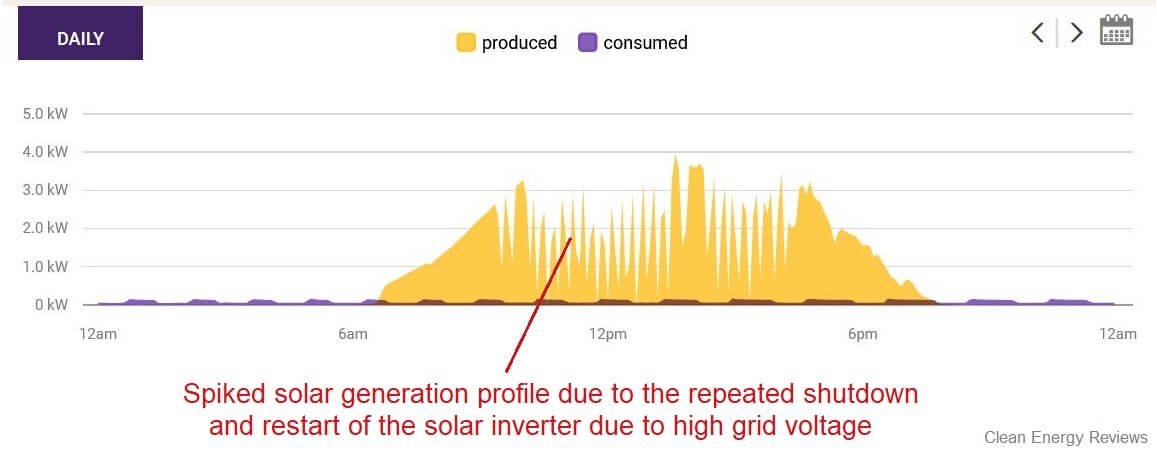
High grid voltage issues will cause a ‘spike’ pattern in the daily solar generation profile due to the on and off cycling of the solar inverter.
For those who are a little more tech-savvy and have a solar inverter with a display, you can often press a button and cycle through different information screens on the display. Check the grid (AC) voltage is not going above 255V; if so, this could be part of the problem, as most inverters will reduce generation above 255V or instantly shut off if the grid voltage goes above 260V.
Solutions to High Grid Voltage Issues
Option 1 - Transformer retap
If you experience frequent high grid voltage issues in your area, the first step is to contact your local grid network operator and inform them of the problem. Unfortunately, if you are not an electrician or solar installer, this can be somewhat difficult, so it’s best to ask your solar company to make a formal request and provide proof of the high voltage issue, which can be obtained from your inverter datalogger or online monitoring portal. Once the request is received, the grid operator can often retap the local transformer in your area to lower the network voltage. In some cases, a relatively simple transformer retap may not be possible for numerous reasons. If this is the case, other measures can be taken to reduce the local voltage, as explained in the next section.
Option 2 - Export limiting
The amount of voltage rise in your home due to exporting excess solar energy generally depends on two main factors: the distance from your home to the local transformer (large utility pole-mounted steel box) and the amount of solar being exported. While you cannot move your house closer to the transformer, you can limit the amount of energy being exported using an export-limiting device such as an energy meter (CT). Most solar inverter suppliers offer an optional energy meter that can be purchased and installed to limit grid export. The rise in grid voltage is directly proportional to the amount of solar power being exported, so limiting the export amount, say from 5kW to 3kW, can, in some cases, solve the problem. Some solar systems, especially those with a battery, will already have a CT or energy meter installed, as these are required to monitor household consumption and control the battery discharging. If you do not have a CT meter, generally, one can be installed by a solar professional for between $250 and $1000, depending on the brand and type of meter.
Option 3 - Upgrade the AC supply cable
If the cable that connects the inverter to the electrical switchboard is undersized, it can cause voltage rise issues. Additionally, if the distance between the inverter and the main switchboard is far, this will also exacerbate the problem as the longer the cable, the more resistance, resulting in voltage rise from the inverter as it tries to export power along the cable back to the grid. In Australia, the cable size must be chosen in accordance with the AS3008 standard. This standard provides clear provisions about cable sizing in different situations and conditions. A licenced electrical professional can asses the cable size and distance to determine whether the cable is undersized.
Option 4 - Increase self-consumption
If options 1 and 2 are problematic or too difficult, the easiest way for a homeowner to reduce high grid voltage issues is to self-consume as much solar energy as possible. Increasing self-consumption will reduce the amount of solar being exported and thus reduce the grid voltage; it will also help save money by using less energy from the grid. A simple (but more expensive) way to do this is to add a battery system to store excess power during the day. However, by far the most cost-effective way is to run energy-intensive appliances like washing machines, dryers, heaters, EV chargers, air-conditioning and pool pumps during the middle of the day, which can be achieved using simple inbuilt timers or smart home controls.
Solar panel problems - Degradation and faults
If you do not have solar system monitoring installed, the first step is to check for any obvious issues with the solar panels, such as a build-up of dirt, dust, mould, or leaves. Maybe a good wash with a soft broom and water is all that they need. Also, check no nearby trees have grown significantly and are shading the panels. Solar panels can suffer from a range of faults and degradation over time, which we explain in much more detail in this article - Solar panel degradation and faults explained.

Five common reasons for solar panel degradation or failure
LID - Light-Induced Degradation - Slow performance loss of around 0.5% per year. This is generally considered normal.
Backsheet Degradation - Rear side backsheet failure (Serious). Common signs include chalking, discolouration, corrosion, cracks, delamination, or burn marks.
PID - Potential Induced Degradation - Long-term losses due to voltage leakage (Serious)
LeTID - Light and elevated Temperature Induced Degradation (Serious)
Micro-cracks and hot spots - Potential long-term failure due to broken or hot cells (Serious)
Blown bypass diodes - Permanent failure often due to severe localised shading or overheating.
Earth leakage is a common problem with older solar panels that is often caused by backsheet failure leading to water ingress or PID or potential induced degradation. Strings of solar panels operate at high voltages, up to 600V or higher. Operating at these elevated voltages over many years can, in some cases, allow a current leak to develop through the cells to the aluminium frames of the solar panels and into the earth, resulting in a significant performance loss. Unfortunately, it is very difficult to detect an earth leakage without specialised equipment, and often, even a trained solar professional can have trouble diagnosing an earth fault.
Six Basic steps to solar panel fault finding
Check the solar system performance data on the app and website, if available.
Check the solar panels for dirt, leaves, mould, or shade issues.
Check the solar inverter for any warnings or faults.
Check that the isolators are all on and that the circuit breakers have not tripped off.
Check the grid voltage on the inverter display or app for over-voltage issues.
Hire a solar professional or electrician to inspect the solar system.
Advanced guide to diagnosing a problem

Micro-cracks may not cause any noticeable performance issues at first, but over several years, they can sometimes develop into more serious problems and result in system failure.
For those much more tech-savvy people, you can compare the solar panel string voltages via the inverter display or wifi app. Solar panels are typically linked together in strings of between 4 and 14 panels and most residential solar inverters have two independent string inputs (often called MPPTs). Most common panels have an operating voltage between 28V and 37V, depending on the air temperature and amount of sunlight. Looking at a typical rooftop solar array, you should see rows of panels which are typically the strings. If you have a simple roof profile, you may have two equal rows of panels which lets you easily compare the string voltages using the solar inverter display or monitoring app.
For example, two strings of 10 panels will have a string voltage of around 300V on a sunny day and using the solar inverter you should be able to display the string voltages. If one string is 275V and the other is 300V and there are no shading issues, then you know you have a problem with one of the strings. Also, if the current (Amps) on one string is significantly different from the other then this may also indicate a problem.
Note, if the strings are different lengths, then you will have to divide the total string voltage by the number of panels in that string, then multiply this by the number of panels in the other string. If you think you have a problem with string voltages then you should contact your solar retailer, a solar installer or a solar professional to inspect the system.
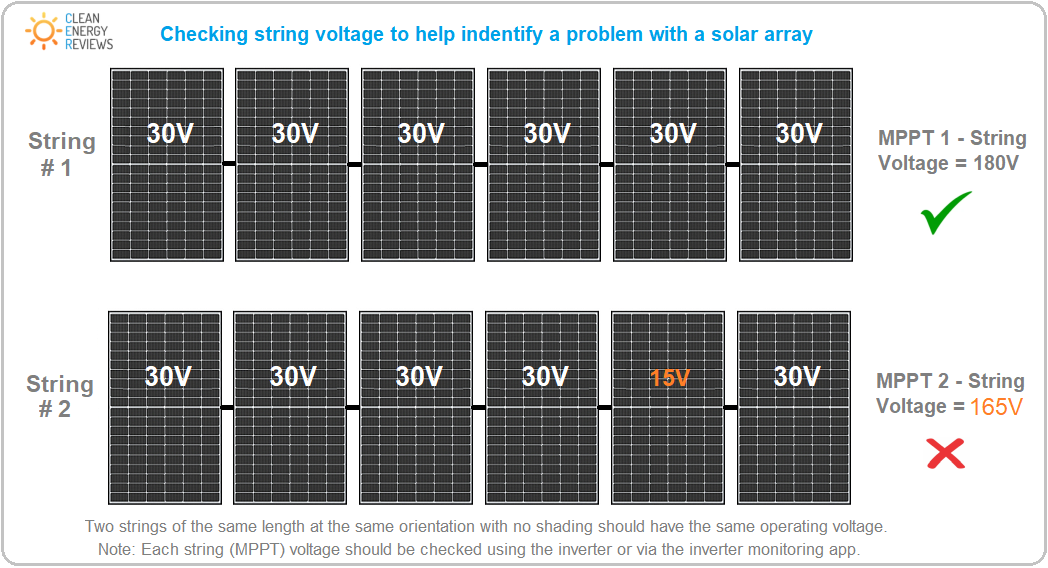
A simple method using the string (MPPT) readings from a solar inverter to determine if two strings with the same number of solar panels are operating correctly. Note, the panel voltage can vary significantly depending on the type and size panel, temperature and amount of sunlight

IMPORTANT - Solar inverters and panels generally operate at dangerous voltages and can cause serious harm, injury or even death. Never disconnect any cables or plugs from the solar inverter or panels! All inspections and servicing must be done only by trained solar professionals or qualified electrical tradespeople.